
Install HABridge 5.3.1 RC3 under Debian 10
Jeder kennt es, es werden manche einige Anleitungen im Internet durchforstet und dennoch kommt man nicht zum Ziel. So ging es mir auch – und zwar mit HABridge. In beiden Versionen die ich getestet habe konnte Alexa nicht meine Geräte finden. Einmal Version 4.8.x und 5.2.x
Everyone knows the problem: You read some Tutorials and they didn’t realy work. I had exactly the same problem, while I am trying to install and use HABridge. I had tested two versions, 4.8 and 5.2 – but Alexa didn’t find any device.
Zu allem Überfluss wird in den Tutorials auf Java 8 gesetzt und dann noch auf Oracle.
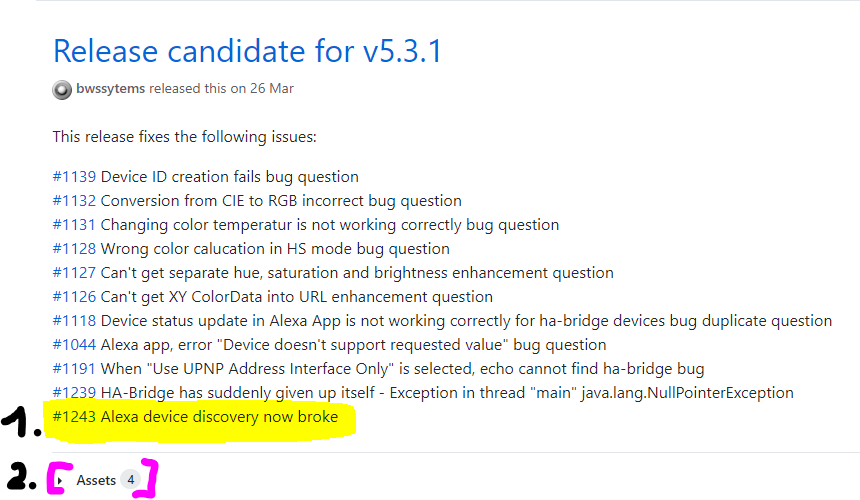
Achtung: In den 5.x.x Versionen gibt es lt. den Entwickler ein Alexa-Bug
Nur diese Version RC3 soll mit Alexa funktionieren. Hab ich im ersten Bild markiert.
Die RC3 kann unter Assets (2) gefunden werden
And, if the problem is not big enough, all tutorials will use Java 8!
I excuse me for my bad english, but I hope with this way, i can deliver some greate Information for all.
Warning: The 5.x.x Versions have problems with Alexa – only this RC3 should be working (See Picture 1. )
The RC3 can be found by Assets (2.)
Okay, lasst uns nun mit der Installation beginnen – ich nutze ein LXD-Container und lasse es unter root laufen, nicht sicher aber… ist ja bei mir zuhause.
Wechsel in das Homeverzeichnis und erstelle ein passenden Ordner:
Okay, let us start with the installation.
I’ll use an LXD-Container and will run HABridge unter root-rights. Not safe, but i runs in my LAN.
Switch in the Homedirectory and create the right folders
cd ~
mkdir habridge
cd habridge
Nun müssen wir Java installieren, natürlich nicht den ganzen Schrott -nur den headless-Modus.
Danach downloaden wir auch direkt HABridge mit wget und starten erstmalig HABridge für ein Test
Now we have to install Java, but not the full dump – only the headless-version.
After this we download HABridge with wget and starts HABridge for test purpose
apt update
apt upgrade
apt install openjdk-11-jre-headless
wget https://github.com/bwssytems/ha-bridge/releases/download/v5.3.1RC3/ha-bridge-5.3.1RC3-java11.jar

java -jar -Dserver.port=80 ha-bridge-5.3.1RC3-java11.jar
In diesem Fall lasse ich HABridge unter Port 80 laufen – das ist wohl für Google Pflicht (konnte ich nicht testen) aber auch für Alexa!
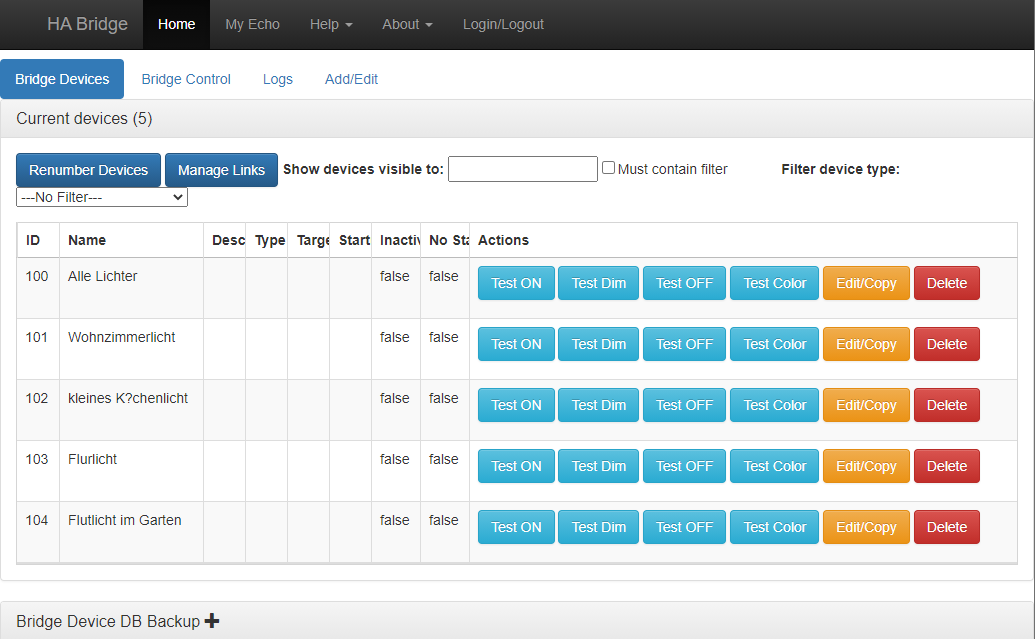
Wenn die Webseite aufgetaucht ist, einfach ein Gerät erstellen – ohne irgendwelche Inhalte. Damit spart man sich Zeit, es soll ja nur die generelle Funktion getestet werden
In this case, I starts the HABridge unter Port 80. This is a MUST for Alexa – and Maybe for Google (i can’t test ist)
After the Config-Site has open, you can add a blankdevice. You didn’t have to configure the device yet, it is just for a test for now.

Im Bild oben seht ihr, dass ich direkt ein paar mehr Geräte erstellt habe.
Und nun kommt der Spannende Moment, wird Alexa sie finden?
Ich hab es über die Webseite versucht:
https://alexa.amazon.de/spa/index.html#appliances
In the picture above can you see, that I have created some more Devices.
And now comes the Moment, will Alexa find them?
I have tried it, with the alexa-website:
https://alexa.amazon.de/spa/index.html#appliances

Hat direkt auf Anhieb geklappt! WOW!
Nach einem Tag voller Frust mit den Anleitungen und der alten Version.. jetzt das?
Worked directly, without any problems!
What? After one day with problmes ans headache causes from terrible how-to and the old version – and now that?
Aber es gibt noch was zu tun und zwar ein Service erstellt werden, damit bei jedem Neustart HABridge automatisch mit startet.
Ich bin ehrlich, keine Ahnung wie eine solche Servicedatei funktioniert, habe aber nach ein paar Minuten Recherche alle wichtigen Infos zusammen gehabt.
Okay, now we shoud create a service-file – for autostart the HABridge with every reboot.
To be honest, I have no idea how such a service file works, but after a few minutes of research I had all the important information together
nano /etc/systemd/system/habridge.service[Unit]
Description=HA Bridge
Wants=network.target
After=syslog.target network-online.target
[Service]
Type=simple
User=root
WorkingDirectory=/root/habridge
ExecStart=/usr/bin/java -jar -Dserver.port=80 /root/habridge/ha-bridge-5.3.1RC3-java11.jar
Restart=on-failure
RestartSec=10
KillMode=process
[Install]
WantedBy=multi-user.targetHinweise
- User=
Ist wichtig, damit der Dienst nicht als systemd ausgeführt wird - WorkingDirectory=
Damit fest definiert wurde, wo die Dateien und das Arbeitsumfeld liegt. Es kann sonst passieren, das eine leere Konfig geladen wird.
Danach als Dienst bekannt geben und aktivieren
Hints
- User =
Is important so that the service does not run as systemd - WorkingDirectory =
This clearly defines where the files and the work environment are. Otherwise it can happen that an empty config is loaded.
After that, activate this as a service.
systemctl daemon-reload
systemctl start habridge.service
systemctl enable habridge.service
Wie man es nun mit z.B. ioBroker nutzen kann, das werde ich vielleicht noch mal erklären, oder auch nicht.
** PS Ich kann leider kein Support zu diesem Thema geben …